Rank: Member
Groups: Registered
Joined: 30/05/2015(UTC)
Posts: 167
Thanks: 50 times
Was thanked: 6 time(s) in 6 post(s)
|
Hi All
Anyone have a pic or can describe how the headlight wiring loom traverses from the drivers side to the passenger side? I am unsure how to route it past the radiator
Cheers
Jacko
|
|
|
|
|
|
Rank: Member
Groups: Registered
Joined: 15/10/2010(UTC)
Posts: 35
Thanks: 2 times
Was thanked: 5 time(s) in 5 post(s)
|
I have a HK 186S GTS Monaro - I can't tell you if it's 100% concours correct but I think so (was installed by someone who restores HKTG Monaros to concours condition - if any of the more knowledgeable folk on here can confirm or correct that would be great) and not sure if it will help for HT but here's how it's routed. Loom comes up through the hole in the RH guard, under the RH side of the brake booster, joins the washer hose travelling over the centre of the RH guard (there are metal clips into the guard under and to the right of the master cylinder and another more or less in the centre of the guard) - comes over the battery tray indent (washer hose swings right to the washer reservoir) to another push in plastic clip just below. About 1/2 way between clip and headlight support panel the loom splits into three - two wires left to the horn, wiring to the right to the RH lights. Central part goes diagonally up through a little gap between the radiator support shroud and the headlight support panel (basically over the top of a bolt holding the two panels together) and up to a metal clip attached to the back edge of the bonnet locking panel. traverse across between radiator and bonnet support panel through a total of 4 of the metal clips before dropping down to the back of the LH headlight support panel. Loom is fully wrapped in tape from the 3 way split across to the LH side 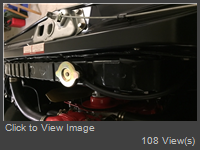 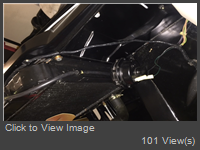 Note - I have a V8 radiator installed now so no 6 cyl radiator shroud but I checked my pre-resto photos and the routing was the same - the 4 clips are held in place by the same screws that hold the shroud to the bonnet locking panel. Edited by user Wednesday, 23 August 2017 10:14:44 PM(UTC)
| Reason: Not specified
|
 1 user thanked WAHK80737 for this useful post.
|
|
|
|
Rank: Member
Groups: Registered
Joined: 30/05/2015(UTC)
Posts: 167
Thanks: 50 times
Was thanked: 6 time(s) in 6 post(s)
|
Hey WAHK
Thanks, exactly what I was after. I had it across the guard but was unsure about how it went over the radiator. Any chance you have a close-up of the clips behind the radiator? Mine was sort of 'draped' down the front (grill side) of it.
Cheers
Jacko
|
|
|
|
|
|
Rank: Member
Groups: Registered
Joined: 15/10/2010(UTC)
Posts: 35
Thanks: 2 times
Was thanked: 5 time(s) in 5 post(s)
|
Jacko, the clips are screwed to the back of the bonnet top catch panel with a Philips head screw and washer on the side I can see (not sure what's on the back side, can't see this, could be a self tapper or screw into a nut). It's hard to get a good photo of it but there's a hole in the curved section of the clip to allow the screwdriver through to turn the screw. With the 6cyl shroud pre-resto there were no clips installed and so the loom just lay across the top of the shroud, back up against the front of the radiator as the shroud slopes back and down. Never recall having any problems with this but couldn't tell you if there were supposed to be clips there or not - suspect there were but they were not there when I bought the car 24 yrs ago so I never knew any different. Simon. 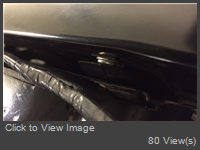 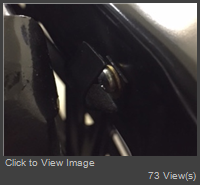
|
1 user thanked WAHK80737 for this useful post.
|
|
|
|
Rank: Member
Groups: Registered
Joined: 21/04/2017(UTC) Posts: 293  Location: Tolmie Thanks: 2 times
Was thanked: 24 time(s) in 24 post(s)
|
they're self tapper screws and the clips are soft metal strips so you can open them to access the screw head and close them up again around the loom. Don't know if anyone sells them new.
|
|
|
|
|
|
Rank: Member
Groups: Registered
Joined: 29/07/2006(UTC)
Posts: 763
Location: in the shed
Thanks: 8 times
Was thanked: 14 time(s) in 13 post(s)
|
|
"I would never want to be a member of a group whose symbol was a guy nailed to two pieces of wood" (George Carlin) |
|
|
|
|
|
Rank: Member
Groups: Registered
Joined: 16/04/2014(UTC) Posts: 768  Location: Victoria Thanks: 1 times
Was thanked: 49 time(s) in 47 post(s)
|
Are those clip nuts a red herring Wayne, or actually used on your car?
They look more like the ones for the headlamp rim.
The loom support clip screws are normally threaded directly into the bonnet slam plate.
|
1 user thanked gm5735 for this useful post.
|
|
|
|
Rank: Member
Groups: Registered
Joined: 29/07/2006(UTC)
Posts: 763
Location: in the shed
Thanks: 8 times
Was thanked: 14 time(s) in 13 post(s)
|
Originally Posted by: gm5735  Are those clip nuts a red herring Wayne, or actually used on your car?
They look more like the ones for the headlamp rim.
The loom support clip screws are normally threaded directly into the bonnet slam plate. Yeah they're the headlight surround nuts |
"I would never want to be a member of a group whose symbol was a guy nailed to two pieces of wood" (George Carlin) |
|
|
|
|
|
Rank: Member
Groups: Registered
Joined: 30/05/2015(UTC)
Posts: 167
Thanks: 50 times
Was thanked: 6 time(s) in 6 post(s)
|
KBM, thanks for those photos- exactly what I was after. I wil have to check my car to see if that panel has any holes int. I can't recall if it did or does now.
Nice pick-up GM, thanks.
|
|
|
|
|
|
Rank: Member
Groups: Registered
Joined: 30/05/2015(UTC)
Posts: 167
Thanks: 50 times
Was thanked: 6 time(s) in 6 post(s)
|
Just visited the garage and yep, the vertical lip of the top radiator support panel has four holes in it for screws. there you go! Thanks to those who posted the pics of the correct clips. Edited by user Tuesday, 29 August 2017 7:52:15 PM(UTC)
| Reason: Not specified
|
|
|
|
|
|
Forum Jump
You cannot post new topics in this forum.
You cannot reply to topics in this forum.
You cannot delete your posts in this forum.
You cannot edit your posts in this forum.
You cannot create polls in this forum.
You cannot vote in polls in this forum.